
The hike to Big Pine Lakes is easily one of the best day hikes in all of California. I mean, who knew there was a little slice of Banff National Park right here in Eastern California?
If the views of Temple Crag and the surrounding mountain ranges don’t take your breath away, the color of the bright, turquoise lakes will most certainly captivate you. Hands-down, this bucket list hike to Big Pine Lakes was the #1 highlight of my latest Eastern Sierra road trip!
Located ~6 hours away from SF and ~5 hours from LA, this epic hike is still a well-kept secret among avid hikers and outdoor enthusiasts. That’s right, you won’t find any influencers with a lighting crew or Instagram models here!
It’s no easy feat, but if you put in the work, you will most definitely be rewarded. Your reward will be the most beautiful, still turquoise lakes in all of California! Keep reading to learn more about the hike as well as read about my experience hiking to Big Pine Lakes.
Lastly, don’t miss my Big Pine Lakes essential tips and packing list at the end of the guide!
This post may contain affiliate links. You won’t be paying a cent more, but in the event of a sale, the small affiliate commission I receive will help keep this blog running/pumping out useful and free content. Thanks a lot!
Need a rental car for your trip? To find cheap rental cars, I always start with Booking.com’s car rental comparison tool. Their search tool is one of the best I’ve found, which is why I go back to it every single time.
Table of Contents
BIG PINE LAKES HIKE: AN OVERVIEW
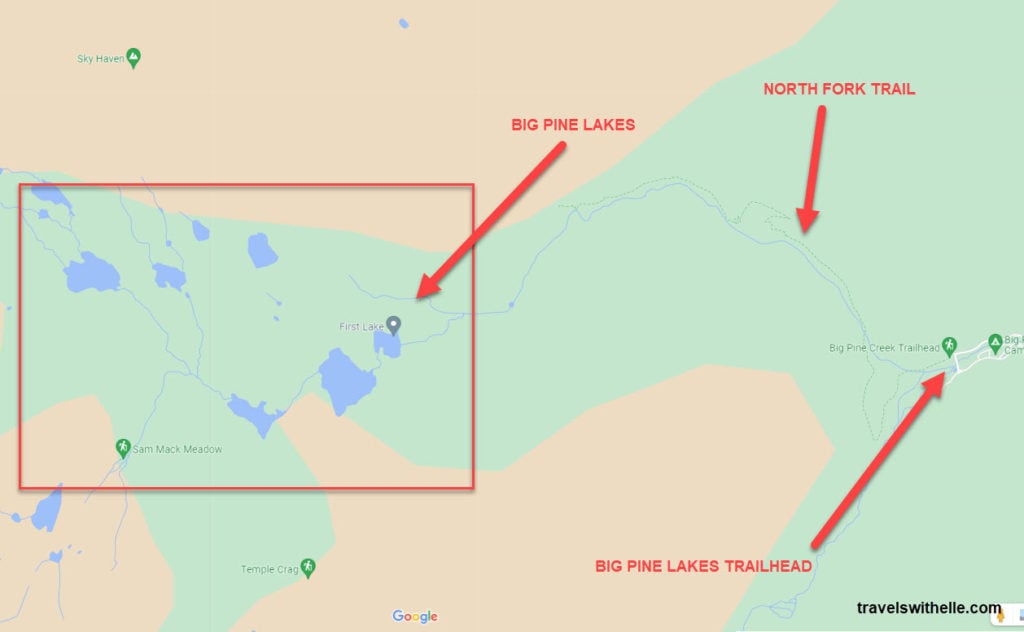
Located in the John Muir Wilderness at the end of Glacier Lodge Road lies the glorious and oh-so rewarding North Fork Trail.
This tucked-away trail leads up to the seven breathtaking Big Pine Lakes. These lakes won’t just be the bluest waters you’ll see in California, but they’ll be that much more postcard-perfect with the rocky peaks of Temple Crag in the background.


The Big Pine Lakes Trail (aka North Fork Trail) is rated as difficult, covering 15-16 miles of distance. Given the total distance and the elevation gain required to reach the lakes, the hike itself is no walk in the park.
The hike starts at Big Pine Creek Campground and works its way back into the Sierra Nevadas, passing by all the pretty lakes along the way.
The first three lakes are known to be the most scenic because they are all set against the majestic backdrop of Temple Crag. For us, experiencing Lakes 1-3 was enough for our day hike.
With that said, you can continue on to see Lakes 4-7 if you have more energy and time on your side.
Should you choose to do only a portion of the trail, you can cut the overall hike distance and turn the traditional loop trail into a shorter, out-and-back trail. For example:
- Lakes 1-3 only will clock you at 11 miles roundtrip (out-and-back style)
- Lakes 1-7 (all of them) will take you up to 15-16 miles roundtrip (loop hike)
Big Pine Lakes: Day Hike or Backpacking Hike?
There are several ways to experience Big Pine Lakes, including day hikes and overnight backpacking trips.
The day hike option
You do not need a permit for a day hike.
The overnight backpacking option
If you plan to go backpacking, you will need a wilderness permit. This permit should be reserved FAR in advance (they are hard to get, but you should definitely try if you want to wake up to the epic sights of the turquoise lakes)!
The current allowance is 25 overnight hikers per day. 15 permits are available to book online 6 months before the permit date, and 10 are reserved for walkups beginning at 11am the day before the permit date.
To book permits in advance, ideally 6 months before the day of your planned hike, visit Recreation.gov. Once you’re on the wilderness permits page for “Inyo National Forest”, select the number of permits you want, then your entry trailhead: JM23 – Big Pine Creek North Fork.
What we did
Had we been able to get permits to stay overnight, we would have definitely opted to go backpacking! We were, however, able to secure campsite reservations at Upper Sage Flat Campground, which allowed us to wake up just 1 mile away from the trailhead for our day hike.
We loved this campground because we slept to the lulling sound of rushing creek water, along the banks of Big Pine Creek!
For the day hike described below, we only visited the first three lakes. We started at 6 am and returned to our campsite at around 1 pm.

BIG PINE LAKES HIKE: THE LOGISTICS
- Distance: 11 miles
- Elevation Gain: 2,850 ft
- Minimum Elevation: 7,800 ft
- Maximum Elevation: 10,300 ft
- Elevation Gain: 3,400 feet around Big Pine Lake 3. If you continue on to the Palisade Glacier, it will be approx. 4,400 feet of gain total.
- Hike Duration: 6-10 hours
- Dog Friendly: Yes
- Permit Required: Permits are not required for day hiking, but are required for overnight backpacking. Reserve up to 6 months in advance here at Recreation.gov.
- Trailhead Location: The trailhead to hike the Big Pine Lakes Trail begins at the Big Pine Creek Campground. There is a small parking lot at the trailhead that fills up pretty quickly on summer weekends. Should you find no parking here, head to the nearby overflow lot (Big Pine Creek Overnight Parking).
- Trail Conditions: Check for the latest trail conditions on AllTrails.
WHERE IS BIG PINE LAKES LOCATED IN CALIFORNIA?
Big Pine Lakes is located in the heart of the Eastern Sierras of California. It is approximately 10 miles west of Big Pine, CA, approximately 15 miles south of Bishop, CA, ~6 hours from the San Francisco Bay Area and ~5 hours from Los Angeles.
The nearest airports to Big Pine, CA are:
- Reno, NV (RNO) – 216 miles, international airport
- Ontario, CA (ONT) – 239 miles, international airport
- Mammoth Lakes, CA (MMH) – 50 miles, domestic airport
BEST TIME TO HIKE BIG PINE LAKES IN CALIFORNIA
By far, the busiest season for hiking Big Pine Lakes is in the summer. July and August are popular months to hike because the clear blue skies result in the lakes giving off the most vibrant hues.
That said, there is one major drawback to hiking Big Pine Lakes during the summer. The heat.
Since most of the trail is exposed to the sun, the hike can be brutally hot, especially if you’re hiking on a day that’s well above 95 degrees Fahrenheit.
We did our hike in mid-August, and I suppose we got “lucky” because it was only about 90 degrees on our hike day… If you plan to hike during the summer, be sure to start early so you can complete the switchback ascent before it becomes unbearably hot.
Honestly, after experiencing it for myself, I’d recommend starting no later than 6:30 am in the summertime.
During the summer, I also recommend going mid-week if possible. Summer weekends do tend to get very busy, so you won’t get very much peace on the trail if that’s what you’re looking for.
Can you hike outside of the summer season? Yes, you can also hike Big Pine Lakes in the late spring after the snowmelt or early fall before the snow comes back around, but note that the lake water might not be as brightly blue during these times of the year.
HOW TO GET TO THE BIG PINE LAKES TRAILHEAD
You will most definitely need a car to get to the Big Pine Lakes. The trailhead does take a bit of driving to get to, so you will want to either camp in one of the nearby campgrounds or stay in a nearby town like Big Pine, CA or Bishop, CA the night before.
There are limited services in Big Pine, CA and full services/more amenities in Bishop, CA.
Need a hotel for the night before your hike? We can’t recommend Wayfinder Bishop enough. It’s one of the best options in Bishop, hands-down!
Need a rental car for your trip? To find cheap rental cars, I always start with Booking.com’s car rental comparison tool. Their search tool is one of the best I’ve found, which is why I go back to it every single time.
From Big Pine, go west on Crocker Avenue, which then becomes Glacier Lodge Road. Follow Glacier Lodge Road until the road ends end of the road. You’ll park at the base of the trail near Big Pine Creek Campground. The parking is limited for day use, and there is no overnight parking here. With that in mind, the best thing you can do is just wake up early for your hike in order to get an early start.
You can expect a vault toilet at the trailhead, so I recommend using it before starting your hike.
BIG PINE LAKES VIA NORTH FORK TRAIL: TRIP REPORT
We woke up from our creekside slumber at Upper Sage Flat Campground at 4:45 am with the goal of arriving at the trailhead at 5:30 am. After more dilly-dallying than we expected, we finally hopped in our car, drove one mile to the trailhead, and arrived at the trailhead parking lot right before 6 am.
At this point, the first parking lot had just been filled, so we had to park in the overflow lot just a few dozen feet away.
Since we started hiking before the sun came up, it was nearly pitch black. Since we were walking right by the rushing creek for a good while, the air was very brisk for the first half-mile (even though it was eventually going to reach 90 degrees in the afternoon). Remember to carry a light jacket with you just for this section if you can’t bear the cold!

This first section is fairly flat. If you’ve started early enough, you can catch the morning’s first rays light up the mountain peaks! You’ll soon reach the junction of the South Fork and North Fork trails. Head right at the fork to take the North Fork Big Pine Trail. You’ll hike a few shaded switchbacks before the views start to open up.


Eventually, you’ll pass a bridge that will take you over an impressive waterfall called First Falls. If you’re tired at this point, take a break at the waterfall bridge and enjoy a quick snack before continuing further.

The hike will then introduce an unshaded, uphill climb. This climb will continue for a couple of miles in the form of a few rocky switchbacks. I know you’re going to be huffing and puffing, but don’t forget to commemorate your hike with a photo by the John Muir Wilderness sign during the climb!
Eventually, you will reach another waterfall section, Second Falls. Once at the Second Falls, enjoy a well-earned break in the shade after such a long, exposed climb. You can even splash your face with some of that refreshing water to help you cool off!
As you make your last climb, you’ll pass by Big Pine Lakes 1, which is stunning in itself. You can walk down to explore and possibly even get a quick swim in! Once you’ve spent enough time soaking up the views of this lake, head back to the trail the same way that you arrived and continue heading uphill. You’ll get to enjoy more views of Big Pine Lakes 1 as you continue up the trail.

You’ll probably want to stop at the first lake for lunch. Don’t do that just yet, because after just a few more steps, the Big Pine Lakes 2 will make its grand appearance.
Ladies and gents, let me tell you the second lake is by far the most impressive out of the series of lakes! This is where all the iconic pictures of the Big Pine Lakes hike are taken, so be sure to snap as many photos as you can until you get that perfect shot!

We spent about an hour or so here, taking pictures of the different lake angles and enjoying our lunches. We saw a bunch of campsites set up around here and realized how lucky these backpackers were to be able to wake up with views as gorgeous and unforgettable as this!
From this point, you can hike for about 0.4 miles to get to Big Pine Lake 3. It’s a wonderful lake that matches the previous two in majestic beauty! Just like with Lakes 1 and 2, you have the ability to wind your way down to the banks of the lake for a quick swim.

Once you’re done enjoy the commanding views of this lake, you have the option of going further to the other lakes and completing the loop trail. The loop will take another ~5 miles. These miles will require some more climbing with at least another 1,000 feet of elevation gain.
After reaching the third lake, we decided to turn around the way we came. We retraced our steps to ultimately get back to the trailhead. Back to the campsite we went to take quick post-hike “baths” in our lovely creek, get in a cat nap, and cook up some hearty, well-deserved burgers!


BIG PINE LAKES HIKE: WHERE TO STAY
The best option for hiking Big Pine Lakes is to camp. Camping at either Big Pine Creek Campground or Upper Sage Flat Campground will allow you to minimize the need to drive and get an early start to the day, thereby reducing your exposure to the hot, blazing sun especially in the summer season.
- Big Pine Creek Campground – This small 30 site campground is the closest to the trailhead, making it our top recommendation for day hikers and backpackers alike.
- Upper Sage Flat Campground – the next best thing and where we stayed for our hike. Offers more campsites and more space for groups. From here, you can either drive to the trailhead or walk to it if you have the stamina to do so.

Do note that these campsites often get booked up pretty early on. If you are not able to snag a campsite at these campgrounds, you can stay in Big Pine, CA or Bishop, CA.
Despite Bishop being further away from the trailhead (40 minutes to be exact) compared to Big Pine, I would recommend booking a hotel here as there are more lodging options. For a more comfortable stay, I recommend the following hotel in Bishop, CA:
- Wayfinder Bishop – One of the best options in Bishop, hands-down! This hotel has a year-round outdoor hot tub and a seasonal outdoor swimming pool. Expect stellar views of the Eastern Sierra Nevada Mountains and a daily hot breakfast too.

If nothing in Bishop, CA or Big Pine, CA works for you, you can also choose to stay in Mammoth Lakes, CA. Staying in Mammoth Lakes will bring you to a 1-hour 15-minute drive to the trailhead.
While it is farther, you’ll have a lot more things to do in Mammoth Lakes, CA!
Pro Tip: If you do stay in Bishop or anywhere further than that, plan to get a very early start as the parking lot fills up by 7 am in the summer.
BIG PINE LAKES HIKE: ESSENTIAL TIPS
- During the summer, I highly recommend starting the hike at 6 am or earlier to avoid getting beaten down by the sun. It may sound early, but you’ll be so much more comfortable struggling with the uphill battle without sun exposure.
- If you can snag an overnight permit, go the overnight camping route. They are really limited, but getting the chance to wake up in front of Temple Crag and these stunning alpine lakes is worth the effort.
- Day hiking Big Pine Lakes is wonderful, but you will be pretty tired at the end of the day.
- You’re going to need plenty of water for this hike, especially if it’s going to be 90-100 degrees Fahrenheit on the day of your hike. I recommend at least 3 liters of water if it’s going to be that hot.
- Be sure to pack plenty of snacks and water to stay fueled for the journey. You should bring a packable lunch to enjoy at the lakes, too. We brought sandwiches with us for our hike!
- You won’t have any cellular service, and your phone’s GPS may be spotty. Screenshot the hike instructions beforehand, or download trail directions for offline access. Lastly, I’d be sure you know what the lakes look like–if you pull up your Google Maps and you’re nowhere near the seven lakes, you’ll know you’ve gone the wrong way.
- If you want to take a dip in the lake, be sure to bring a quick-drying travel towel and a bathing suit. The water is very, very cold so it’s best not to be in there for too long.
- Note, there is a vault toilet at the trailhead, but none after that point. If you gotta go somewhere on the trail, always pack out what you pack in!
- The trail has a few small creek crossings, but as long as you have either waterproof hiking boots or hiking poles to help keep your balance, you should be fine. If your balance happens to be terrible (like mine is lol) and you don’t have waterproof shoes, bring an extra pair of socks just in case!
- The trailhead to Big Pine Lakes sits at an elevation well above sea level, which means for a lot of us, we’ll need to remember to acclimate to the altitude. Take this seriously, because I’m talking 8,000 – 10,000 ft above sea level! You will probably feel the elevation while walking on flat ground, hiking, and even sleeping. Be sure to pace yourself, drink lots of water (more than you’re used to drinking), and avoid alcohol if you can help it.
- If you’re traveling in the summer, be sure to check for forest fires before embarking on your trip. We like to use Cal Fire’s Incidents Overview Map to check if there are any fires along our route. If there happens to be a fire nearby, check out the Air Quality Index before going, especially if you plan on being outside a lot.
- If the day-use parking lot is full, you can park at the overnight parking area. If that’s the case, plan to add another 0.6 miles to your trip each way.
- Wondering how many lakes to see on your hike? Lakes 1-3 are the most impressive. Lake 4 is not turquoise, and while Lake 5 is a beautiful blue, it’s still not quite as impressive as Lakes 1-3.
- I always like to check for the latest trail conditions on AllTrails. You’ll be able to see recent trip reports and get the latest inside scoop on weather, animal sightings, flooding, other things to watch out for, etc.
BIG PINE LAKES HIKE: ESSENTIAL PACKING LIST
Hiking Boots | Bring broken-in boots with good ankle support and good traction. My all-time favorites are the Lowa Renegade GTX Mid Boots. They’re one of the lightest boots in its class, very durable, and provide out-of-the-box comfort, which is extremely important if you want to prevent blisters from the start.
Hiking Socks | Make sure you have a good pair of cushioned wool hiking socks. For extra toe protection and to prevent blisters from developing from skin-to-skin contact, go with a pair of Injinji toe socks.
Hiking poles | Very helpful for more intense hikes like Big Pine Lakes. Here is a budget-friendly option, or a lighter, higher-quality, more ergonomic option
Lots of water and snacks | maybe even a packable lunch for you to enjoy at the lakes.
Stinger Waffles are one of my favorite sources of quick and delicious energy.
Moisture-wicking clothes with sun protection | You’ll be sweaty and hot, so dress accordingly. A light long-sleeve shirt like Patagonia’s Capilene Cool Shirt is great for long and sunny hikes like this. Even though it’s a long sleeve (for that much-needed sun protection), it won’t trap heat.
Waterproof Rain Jacket | A lightweight waterproof rain jacket is critical for any outdoor adventure. Nights here in the mountains can get cold, and you never know when rain may come. Since these weigh virtually nothing and are so easily packable, I recommend you carry one with you whenever you head outdoors. Depending on the weather forecast and chance of precipitation, I’ll either go with a rain shell or a puffier windbreaker. Despite the options I have here, one thing is for sure— I’m never without some sort of outer layer.
Packable Puffy Jacket | If you’re traveling in the early spring or fall, you’re going to need layers in the mountains, especially at times when the sun is not up. You have a lot of options here, but I personally have the Patagonia Nano Puff. It’s an investment for sure, but it’s kept me warm throughout over a decade of outdoor adventuring!
Daypack | I’m a fan of the Osprey Daylite Daypack. It has ample room for all the snacks and water you’ll need, as well as for your camera and the safety essentials for the hike.
Camelbak Water Reservoir | I love water reservoirs for a few reasons. For longer hikes, it’s always best to bring a water reservoir of 2-3 liters of water with you.
Sunhat | Sun protection is key here. It’s especially important when you’re at higher elevations!
Sunscreen | Sunscreen is absolutely necessary for mountain destinations. Even if it’s overcast or cloudy, the UV index can be very high, so be sure to apply whenever you’re outdoors. No matter where we go, we like a coral reef-safe brand, as traditional sunscreens contain chemicals that damage our environment. For the face, we are absolutely obsessed with Supergoop! Unseen Sunscreen.
Mini survival kit | Get one that’s pre-made like this one, or make your own. Be sure to carry this with you in your hiking backpack.
Travel Towel | These are light and quick-drying, which is exactly what you need when you’re hopping from the lake back into your shoes. This one here is a great option.
Hand Sanitizer | Hand sanitizer gel or wipes are a must any time you’re going to be in contact with surfaces many other people have touched. Never leave your hotel room without it! And if you do happen to forget it, remember to wash your hands often, especially before eating or touching your face.
Headlamp / Flashlight | This is a must if you’re going to be camping or hiking before the sun is up. An LED headlamp allows you to hike hands-free and is my preferred source of light. FYI, the flashlight on your smartphone is not an adequate substitute– the light is not bright enough, plus it’ll drain your battery life, which may be critical in an emergency. Always carry extra batteries!
First Aid Kit | It’s always good to carry a first aid kit around with you when traveling. Road trips make it easier to do this since all you need to do is toss it in the trunk! Note: This is not the same as the roadside emergency kit.
Medications | Motion sickness pills for those windy roads; ibuprofen for the downhill hike, etc.
Want more Eastern Sierra travel tips? Read More:
Best Things To In California’s Eastern Sierra: Yosemite, Mammoth, Bishop, and More
32 Exciting Things To Do In Mammoth Lakes, California
The Best Things To Do In Lake Tahoe/Reno: Stops From San Francisco To Lake Tahoe
Mt. Whitney Packing List: Essentials to Bring on Your Hike (+ Mt. Whitney Hiking Tips)
Glamping Near Yosemite: 8 Places For A Luxurious Stay
Other Posts You’ll Love:
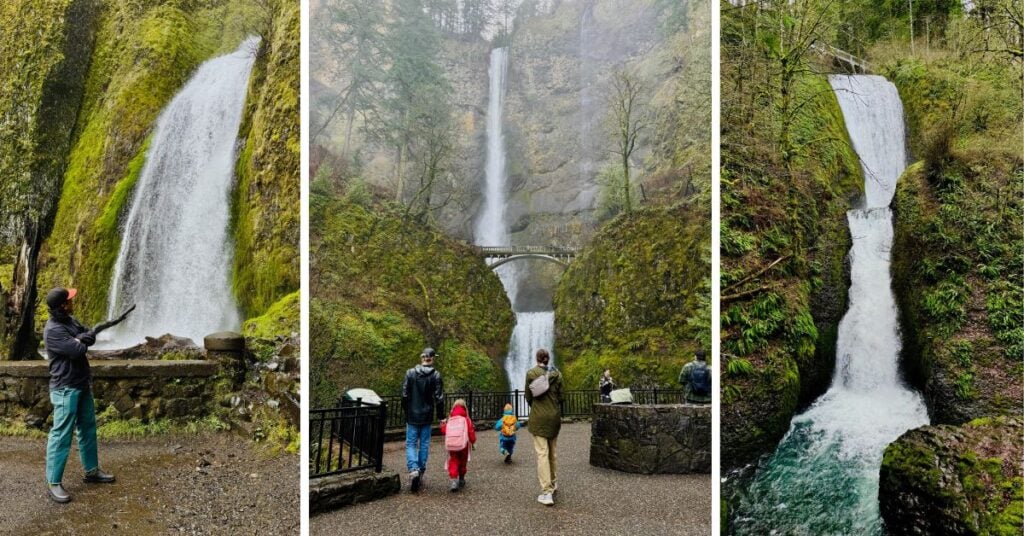
Columbia River Gorge In Half A Day: 5 Waterfalls, 1 Hike, and Endless Awe
If it’s your first time visiting the Columbia River Gorge, chances are you’ve been captivated…

15 Tips To Make Your Next Camping Trip Way More Fun
Everyone knows someone who hates the idea of camping. Either that’s you yourself, or you’re…

7 Mountain Towns In The US Worth Visiting This Summer
There’s something about the combination of forested trails and dramatic mountain backdrops that I never…

Best Time To Visit Lower Antelope Canyon (+ Essential Tips For Your Visit)
Antelope Canyon is a total dream. We’re talking wave-like canyon walls that twist and swirl…
The Perfect Antelope Canyon And Horseshoe Bend Itinerary
Antelope Canyon is a total dream. We’re talking wave-like canyon walls that twist and swirl…

The Ultimate Beach Camping Packing List: 32 Must-Have Items
Camping at the beach can look a lot of different ways. For some, it’s fishing…